前言
本篇記錄 透過 Azure Devops Pipeline Deploy .NetCore 和 Vue 的專案
目標
- 當專案指定的分支有異動時,透過Azure Devops Pipeline 自動 Deploy 至 Azure App Service
- 區分不同環境的設定值
.Net Core 專案 前置作業
預先設定好 Azure App Service
預先準備好 .Net Core 專案
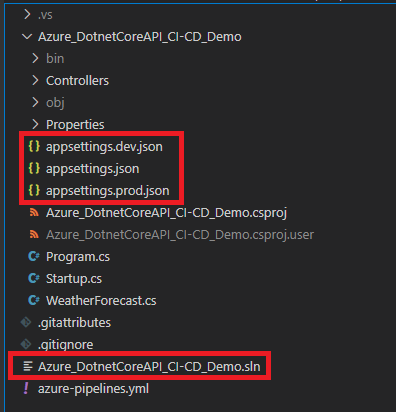
確認 *.csproj 相同路徑下 含有 appsettings.dev.json、appsettings.prod.json
確認 *.sln 相同路徑下 含有 azure-pipelines.yml
確認分支 含有 master、DEV
可參考 .NetCore3.1 範例專案
設定 .Net Core 專案 azure-pipelines.yml
.Net Core 區分不同環境是透過 環境變數 ASPNETCORE_ENVIRONMENT 來區分
master 分支 指定 ASPNETCORE_ENVIRONMENT = prod 則會吃到 appsettings.prod.json 的設定
DEV 分支 指定 ASPNETCORE_ENVIRONMENT = dev 則會吃到 appsettings.dev.json 的設定
# ASP.NET Core (.NET Framework)
# Build and test ASP.NET Core projects targeting the full .NET Framework.
# Add steps that publish symbols, save build artifacts, and more:
# https://docs.microsoft.com/azure/devops/pipelines/languages/dotnet-core

trigger:
- master
- DEV

pool:
  vmImage: 'windows-latest'

variables:
  solution: '**/*.sln'
  buildPlatform: 'Any CPU'
  buildConfiguration: 'Release'

  ${{if contains(variables['Build.SourceBranchName'], 'master')}}:
      EnvironmentName: 'prod'
  ${{if contains(variables['Build.SourceBranchName'], 'DEV')}}:
      EnvironmentName: 'dev'


steps:
- task: PowerShell@2
  inputs:
    targetType: 'inline'
    script: |
      [Environment]::SetEnvironmentVariable("ASPNETCORE_ENVIRONMENT", "$(EnvironmentName)", "Machine")
- task: DotNetCoreCLI@2
  displayName: Restore
  inputs:
    command: restore
    projects: '$(solution)'

- task: DotNetCoreCLI@2
  displayName: Build
  inputs:
    projects: '$(solution)'
    arguments: '--configuration $(BuildConfiguration)'

- task: DotNetCoreCLI@2
  displayName: Publish
  inputs:
    command: publish
    publishWebProjects: True
    arguments: '--configuration $(BuildConfiguration) --output $(build.artifactstagingdirectory) '

- task: PublishBuildArtifacts@1
  displayName: 'Publish Artifact'
  inputs:
    PathtoPublish: '$(build.artifactstagingdirectory)'
Vue 專案 前置作業
預先設定好 Azure App Service
預先準備好 Vue 專案
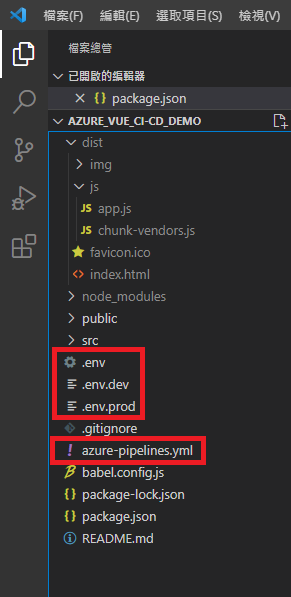
確認package.json 相同路徑下 含有 .env.dev、.env.prod檔案、azure-pipelines.yml
package.json 設定 build-dev 、 build-prod
確認package.json 相同路徑下 含有 azure-pipelines.yml
確認分支 含有 master、DEV
可參考 Vue 2 範例專案
設定 Vue 專案 azure-pipelines.yml
Vue 區分不同環境設定 可透過 vue-cli-service build –mode ${env}
master 分支 指定 env = prod 則會吃到 .env.prod 的設定
DEV 分支 指定 env = dev 則會吃到 .env.dev 的設定
# Starter pipeline
# Start with a minimal pipeline that you can customize to build and deploy your code.
# Add steps that build, run tests, deploy, and more:
# https://aka.ms/yaml

trigger:
- master
- DEV

pool:
  vmImage: vs2017-win2016

variables:
  ${{if contains(variables['Build.SourceBranchName'], 'master')}}:
      Temp_Env: 'prod'
  ${{if contains(variables['Build.SourceBranchName'], 'DEV')}}:
      Temp_Env: 'dev'

steps:
- task: Npm@1
  displayName: 'npm install'
  inputs:
    verbose: false

- task: Npm@1
  displayName: 'npm build'
  inputs:
    command: custom
    verbose: false
    customCommand: 'run build-$(Temp_Env)'

- task: ArchiveFiles@2
  displayName: Archive
  inputs:
    rootFolderOrFile: '$(build.sourcesDirectory)/dist'
    includeRootFolder: false
    archiveFile: '$(Build.ArtifactStagingDirectory)/$(Build.SourceVersion)_$(Build.BuildId).zip'


- task: PublishBuildArtifacts@1
  displayName: 'Publish Artifact: build'
  inputs:
    ArtifactName: build
設定 Azure Devops Pipeline (CI流程)
(.Net Core 和 Vue 流程一樣,選取各自的git source & azure-pipelines.yml即可)
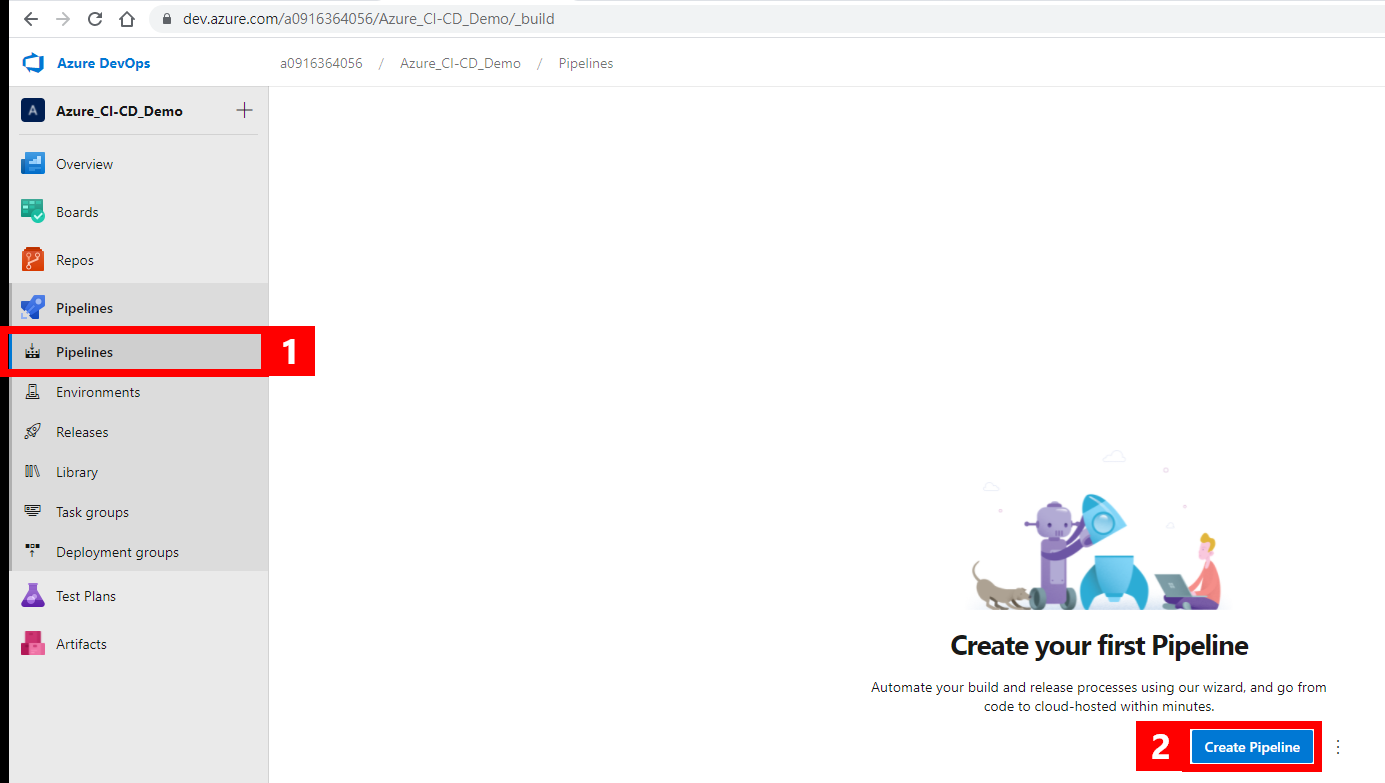
建立 Pipeline
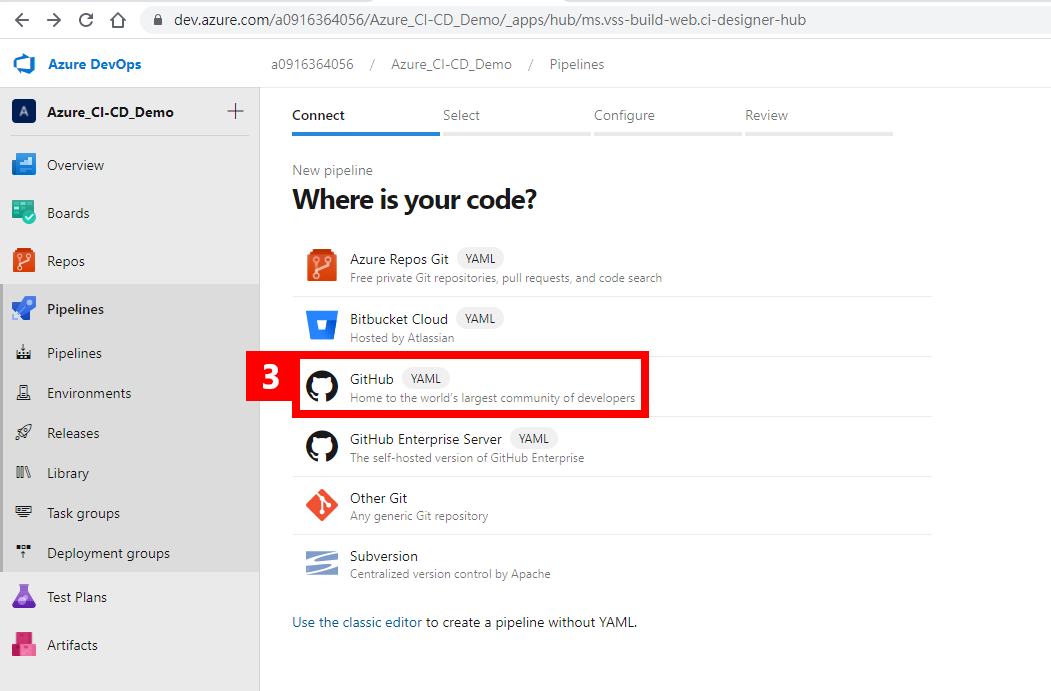
設定 專案 Git SourceCode 來源
選完後 會需要Github帳戶允許權限 照頁面引導一步一步做即可
選取使用專案內的azure-pipelines.yml
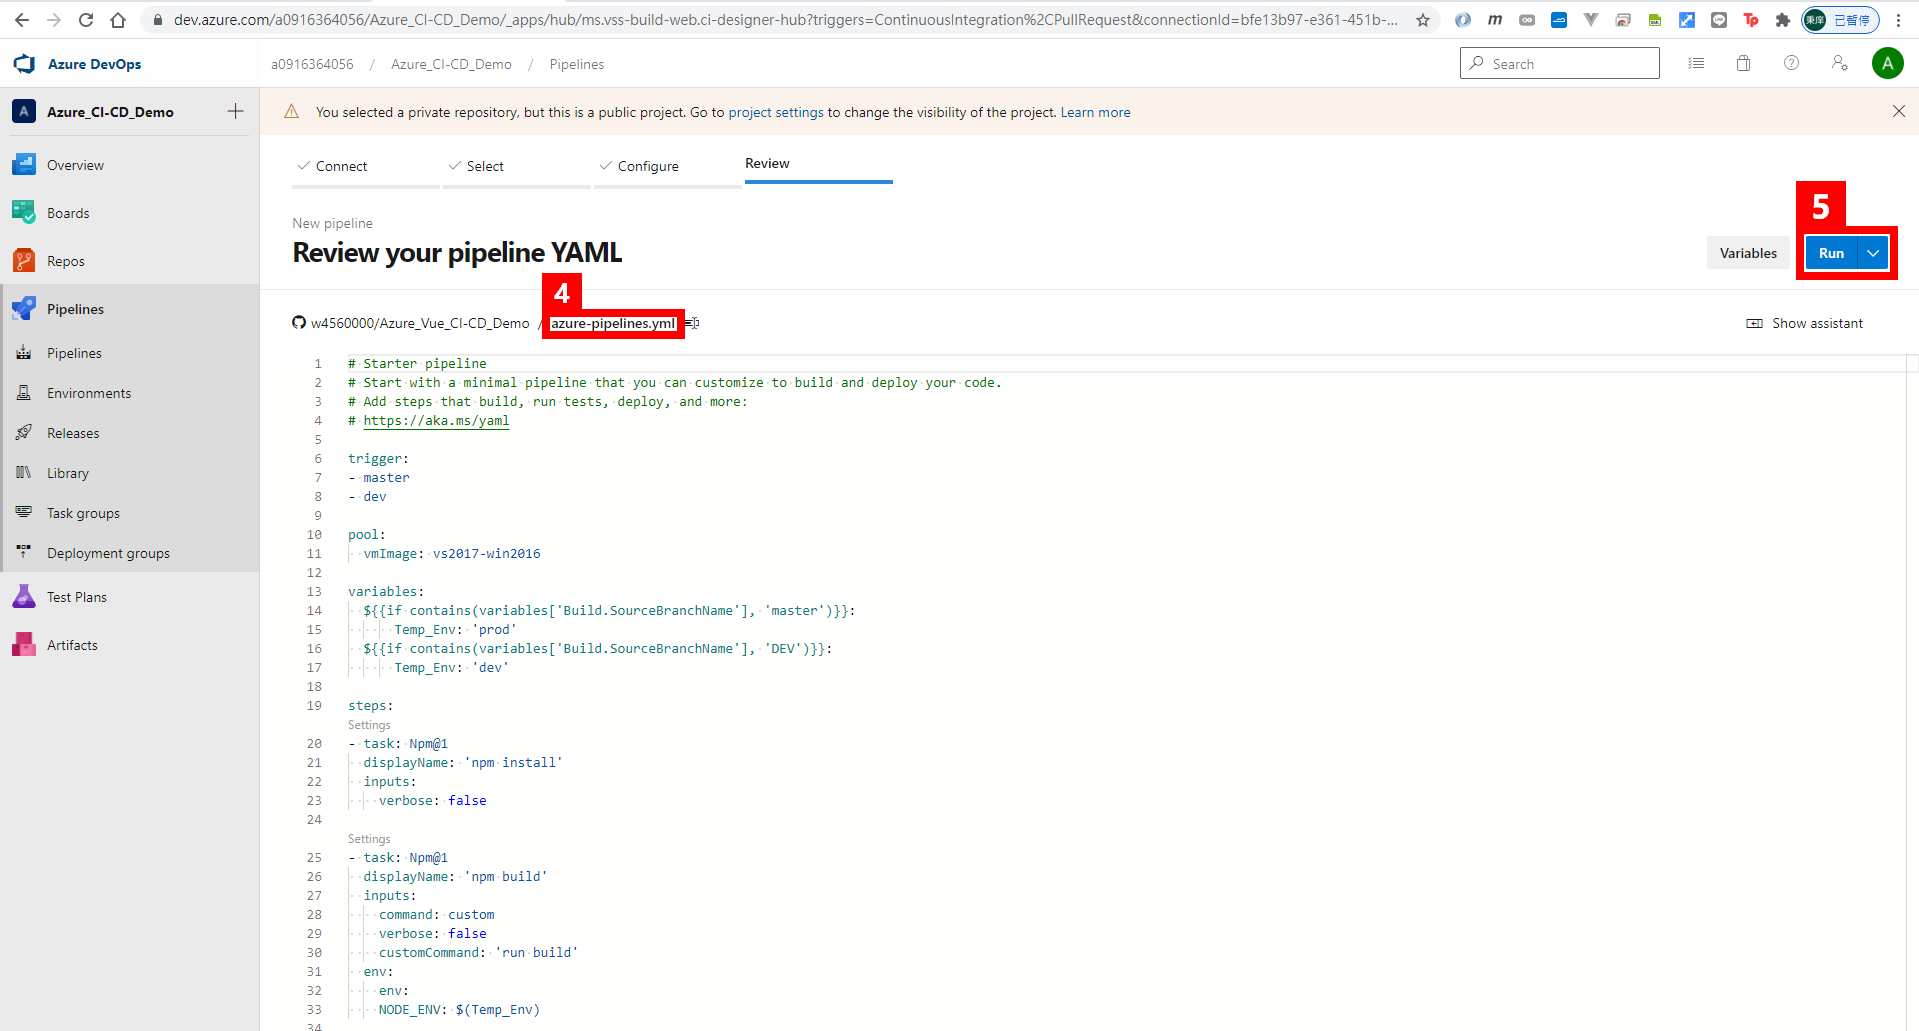
設定 Azure Devops Pipeline Releases (CD流程)
(.Net Core 和 Vue 流程一樣,選取各自要deploy的app service即可)
有另外設定 trigger 不同分支 deploy至不同環境的app service 故設定流程多了一些
建立 Release Pipeline
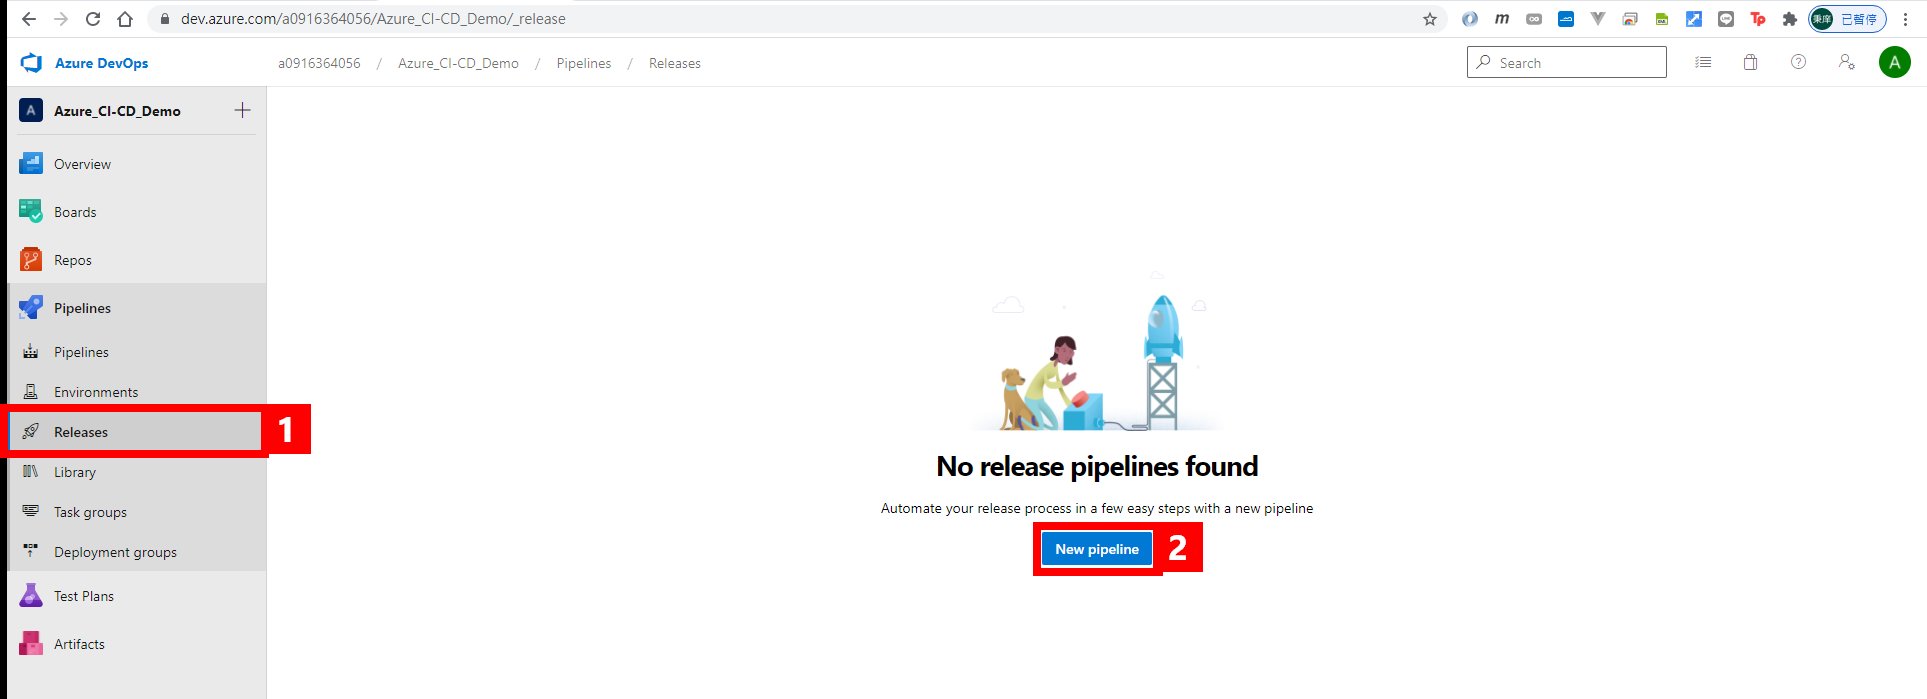
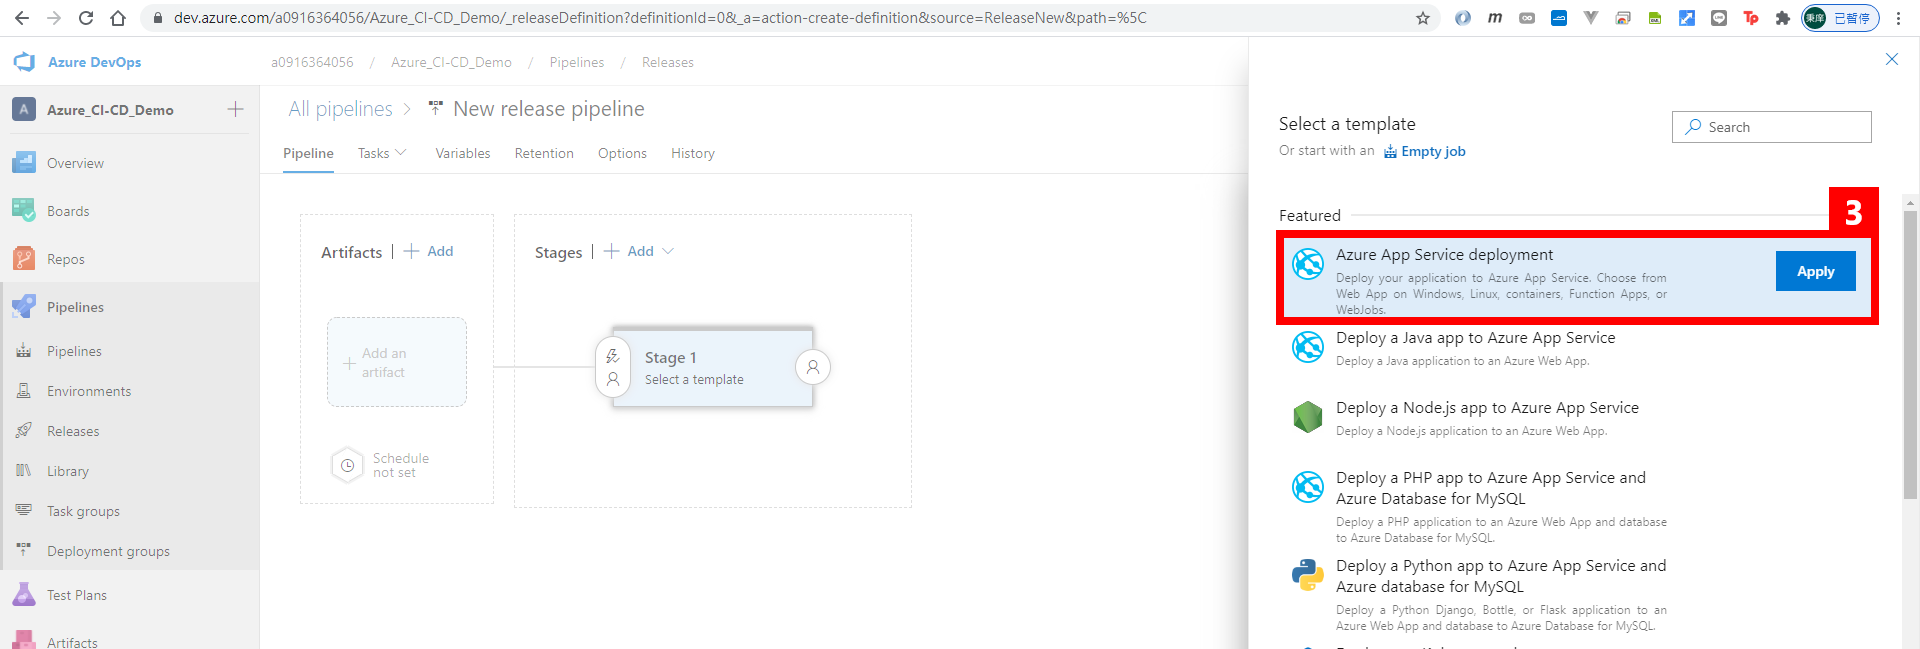
設定 Deploy 至 Azure App Service
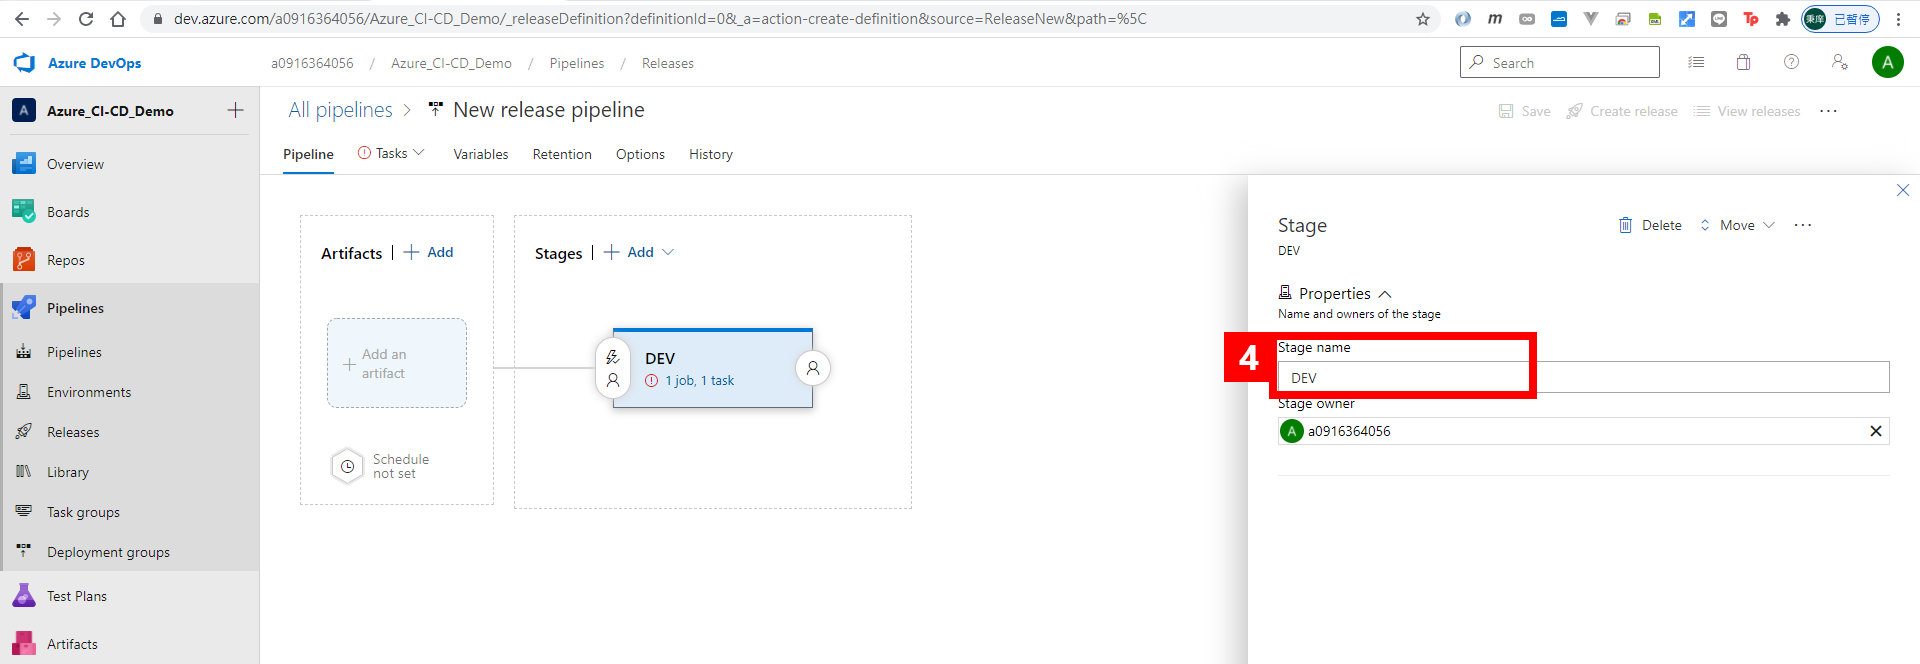
設定 DEV Stage
設定 程式CI完的Artifact
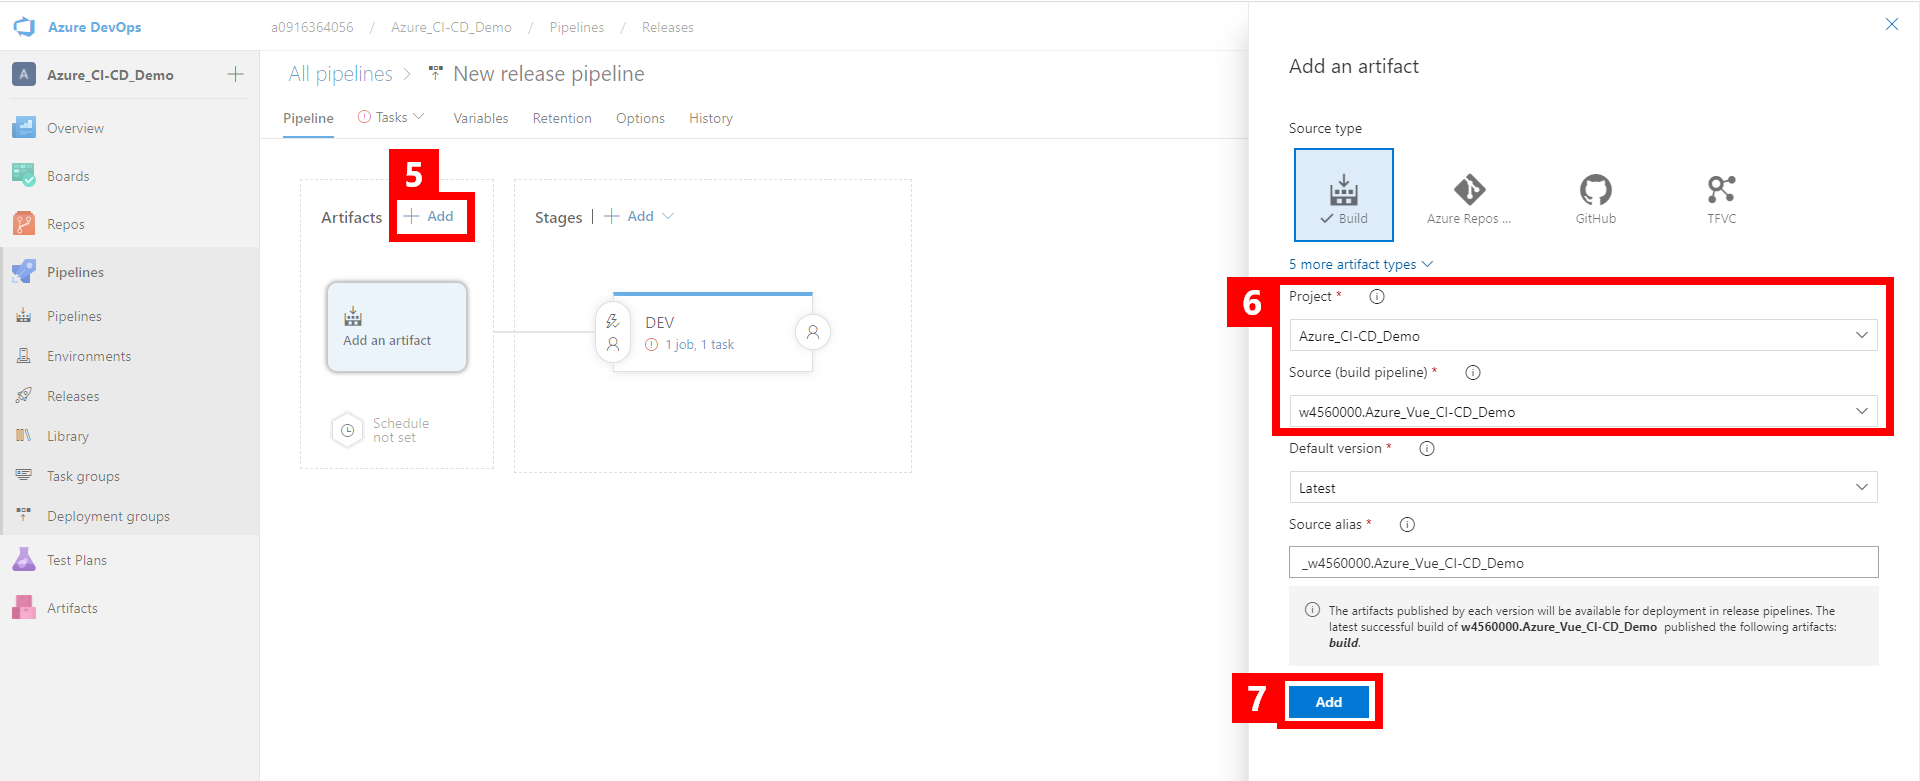
啟用 CD trigger
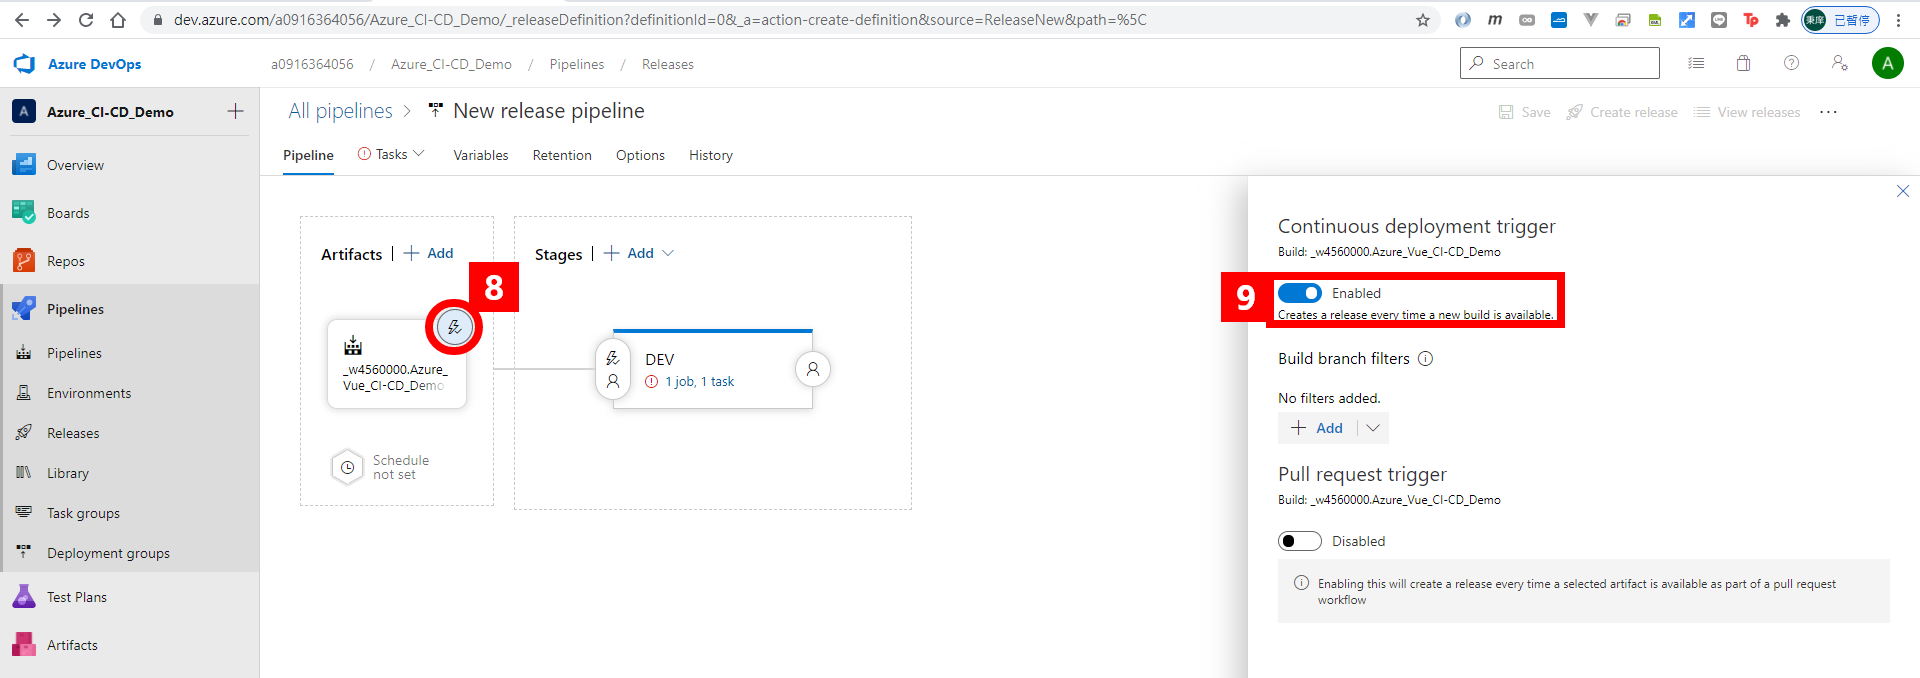
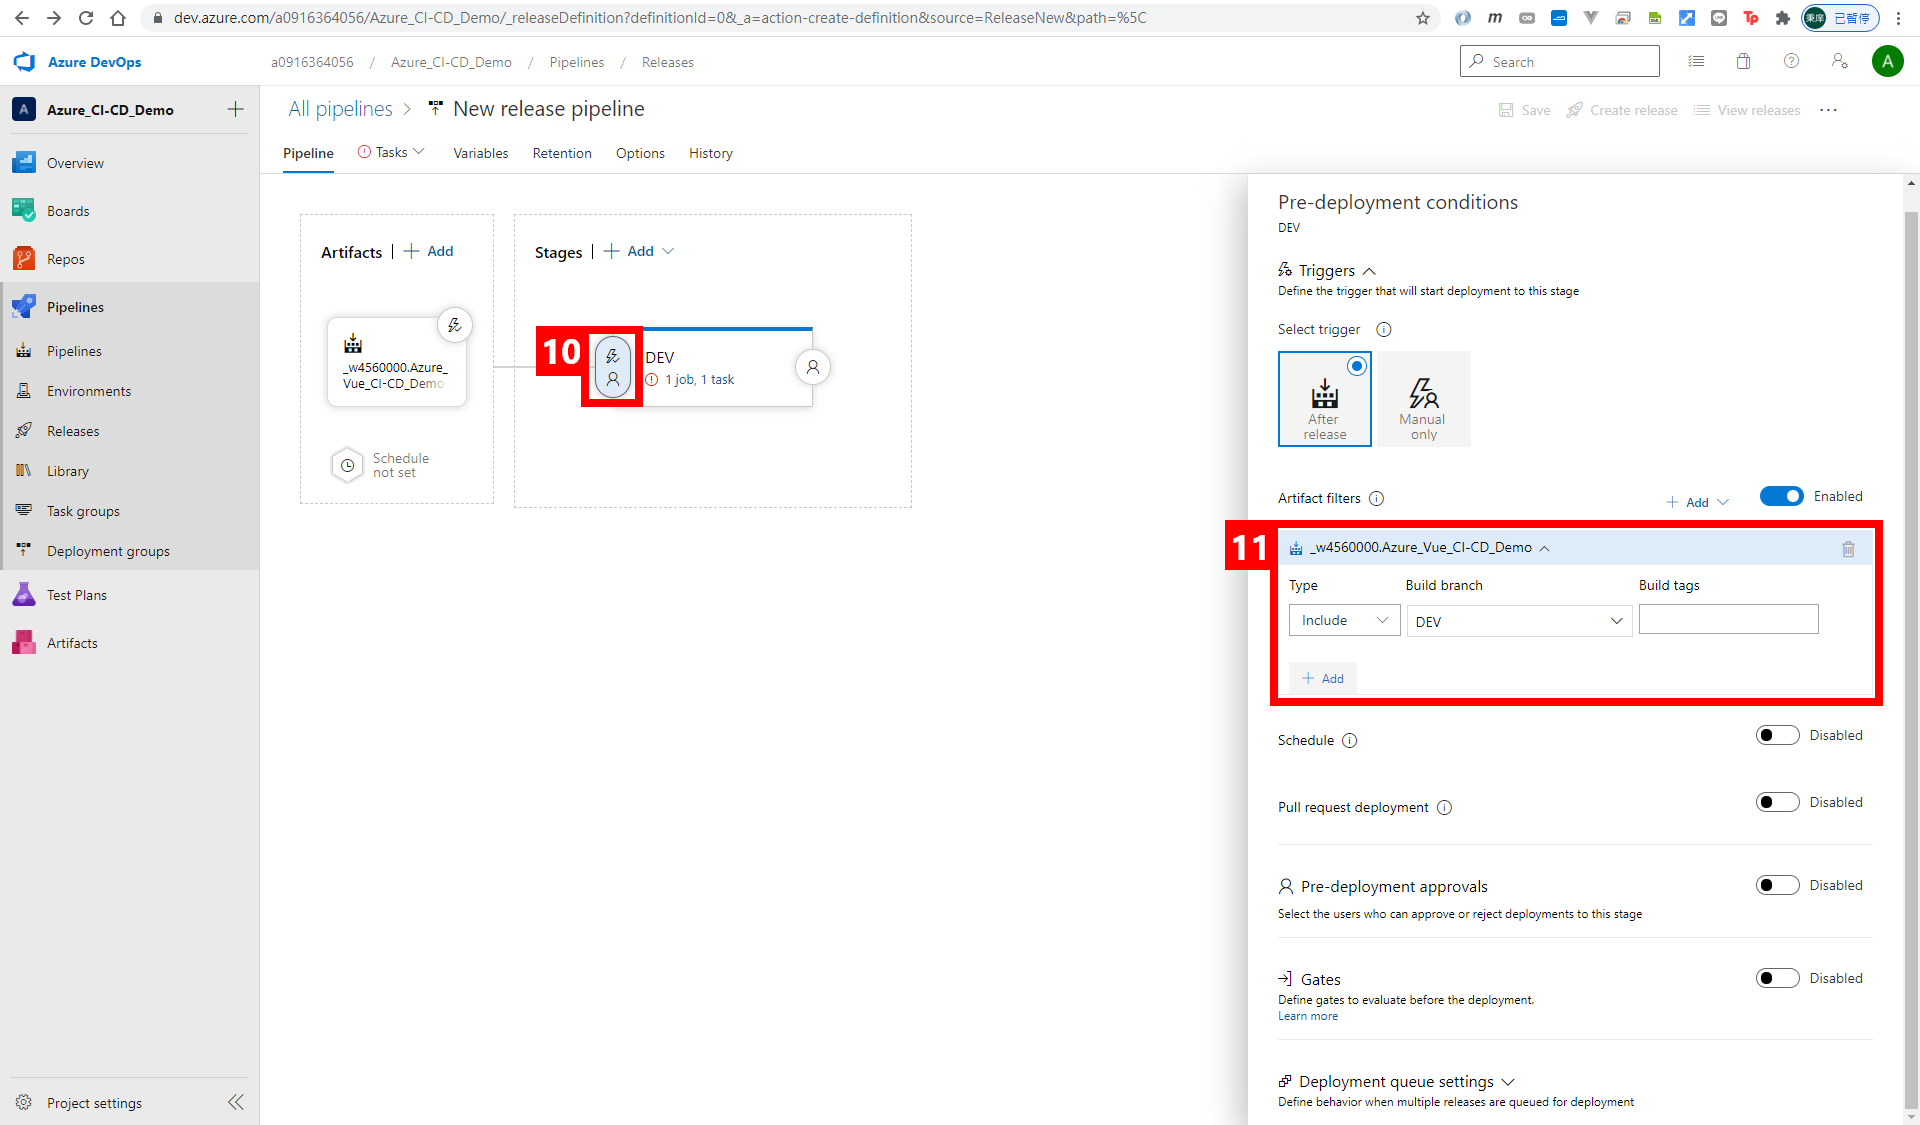
設定 DEV Stage Artifact filters
因要指定特定分支 deploy至 特定 app service
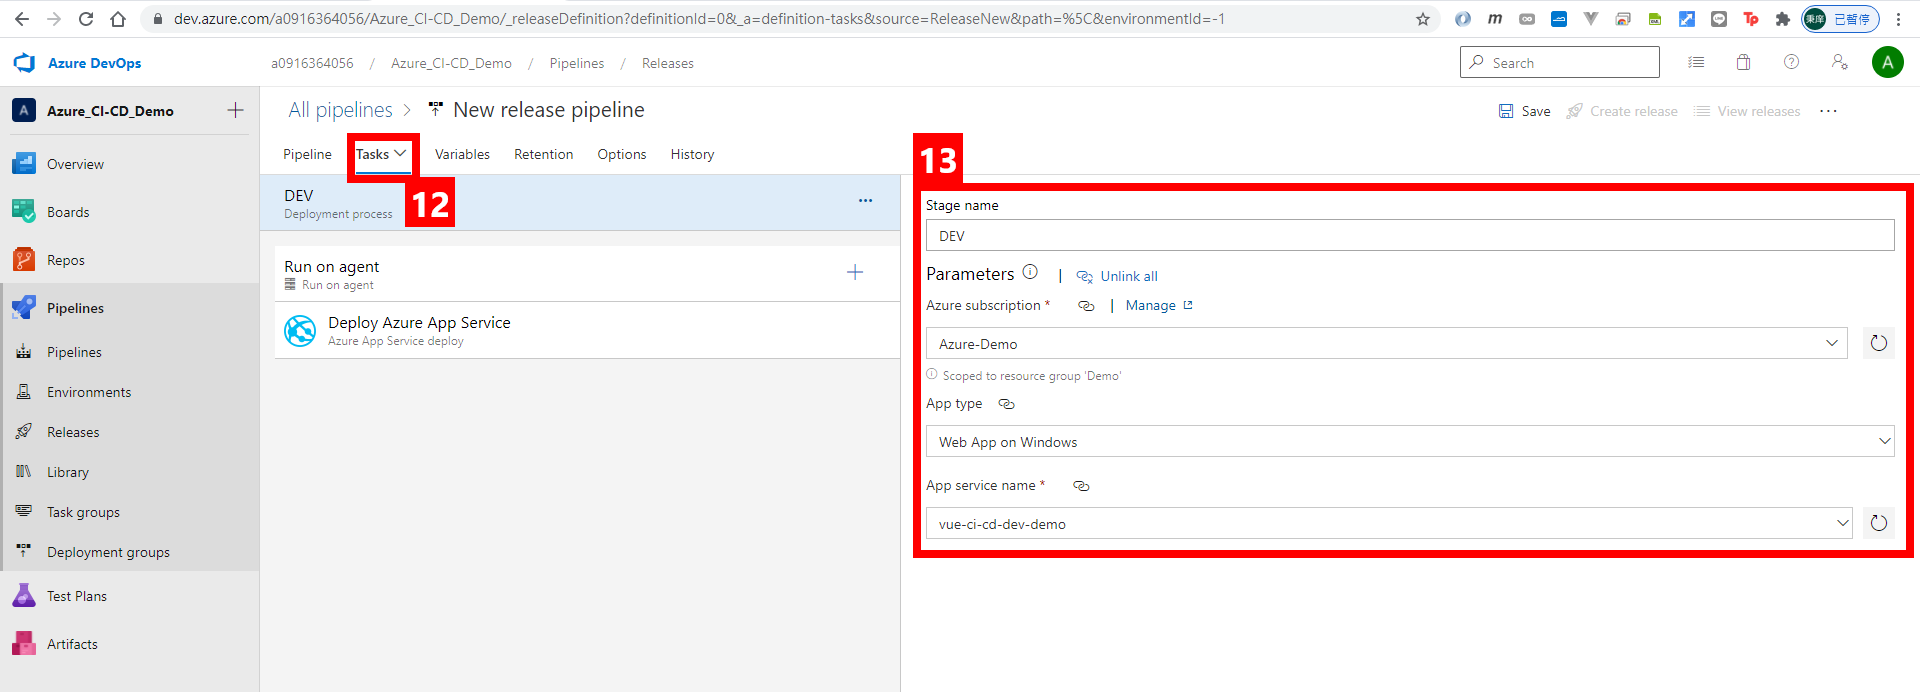
設定 deploy 至 app service
再來設定 PROD Stage
流程跟設定DEV Stage類似
11點 需指定對應的branch
13點 需指定對應的Azure app service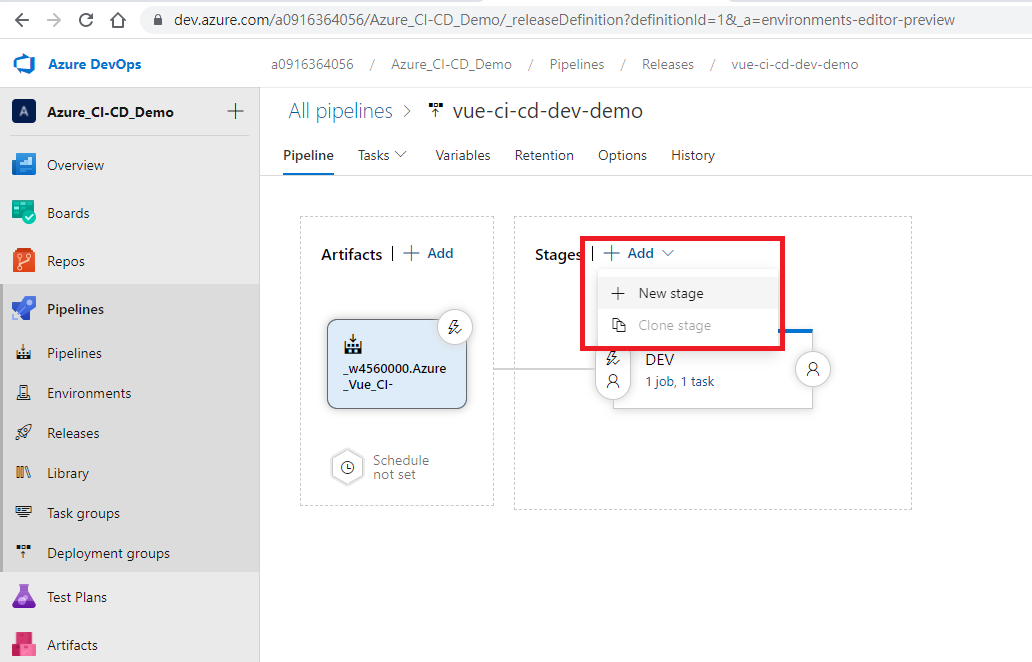
設定完成後 預期會有 DEV Stage & PROD Stage
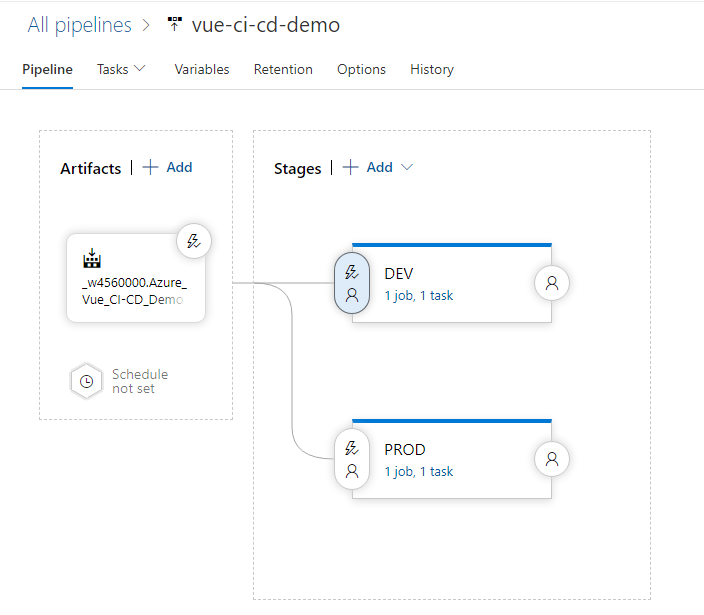
建立完成後 確認 Pipelines、Releases 是否正常
在.NetCore 專案 & Vue專案 各push一版commit到指定分支,測試看看是否正常
正常的話 會自動跑完CI/CD流程並deploy至Azure App Service
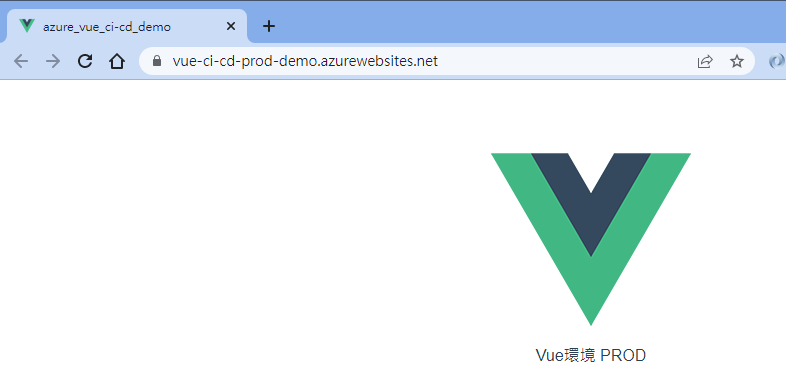
且DEV分支 & master分支,會各自deploy至 測試機 和 正式機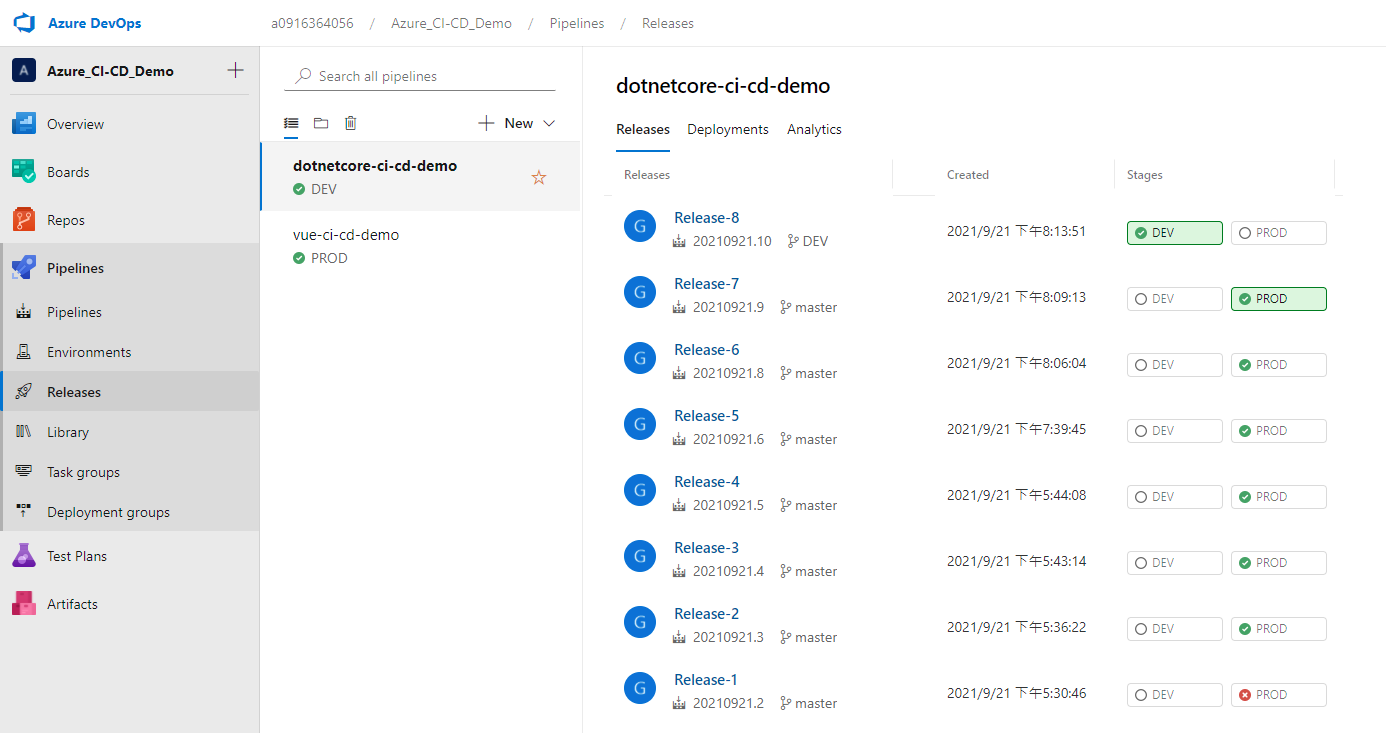
回到 Azure App Service 的 部屬中心 也可以看到有正常部屬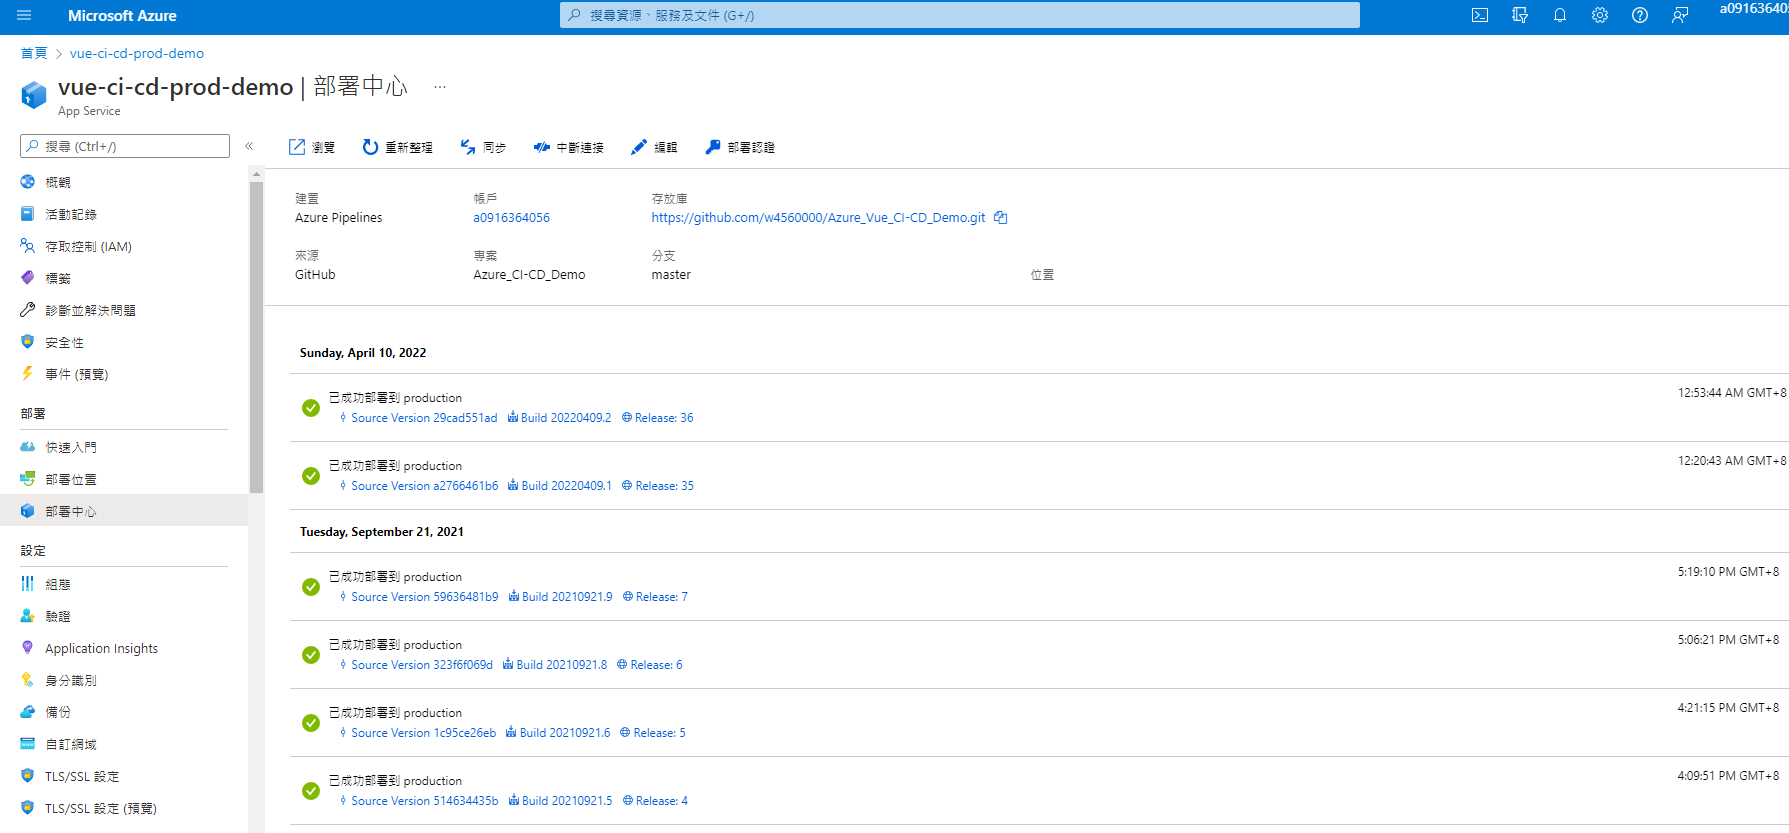
轉載請註明來源,若有任何錯誤或表達不清楚的地方,歡迎在下方評論區留言,也可以來信至 leozheng0621@gmail.com
如果文章對您有幫助,歡迎斗內(donate),請我喝杯咖啡
