前言
繼上一篇 w4560000 - Octopus Deploy K8S 專案 [2] - GKE
已成功部屬到 GKE 後,本篇實作 設定 HorizontalPodAutoscaler
讓 POD 能夠依照設定的 CPU 、 Memory 水位來自動增減 POD 數量
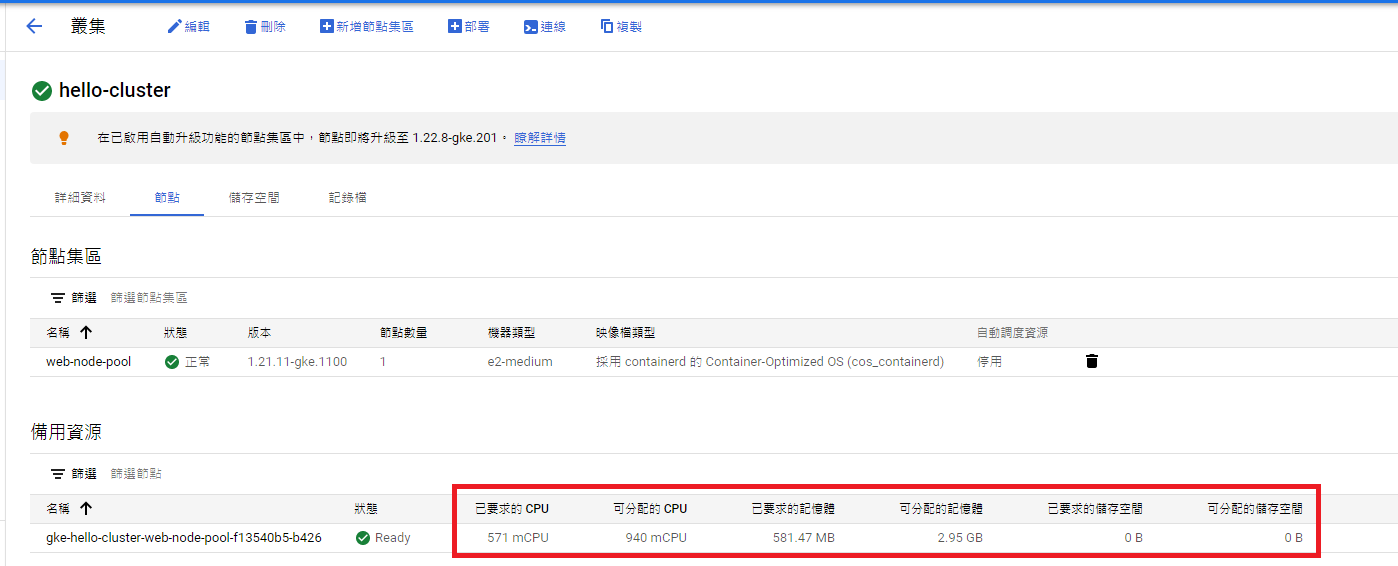
確認目前 K8S Node 資源
GKE 介面 可查看 Node 資源
已要求的 CPU = 571m,可分配的 CPU = 940m
已要求的記憶體 = 581.47MB,可分配的記憶體 = 2.95GB
或是透過 kubectl cli 查詢
kubectl describe node

# 輸出
Name:               gke-hello-cluster-web-node-pool-f13540b5-b426
...略過...
Allocatable:
  attachable-volumes-gce-pd:  15
  cpu:                        940m
  ephemeral-storage:          47093746742
  hugepages-1Gi:              0
  hugepages-2Mi:              0
  memory:                     2883480Ki
  pods:                       110
...略過...
Non-terminated Pods:          (12 in total)
  Namespace                   Name                                                        CPU Requests  CPU Limits  Memory Requests  Memory Limits  Age
  ---------                   ----                                                        ------------  ----------  ---------------  -------------  ---
  kube-system                 event-exporter-gke-5479fd58c8-wj4hl                         0 (0%)        0 (0%)      0 (0%)           0 (0%)         14d
  kube-system                 fluentbit-gke-f8vqc                                         100m (10%)    0 (0%)      200Mi (7%)       500Mi (17%)    7m34s
  kube-system                 gke-metrics-agent-plnvv                                     3m (0%)       0 (0%)      50Mi (1%)        50Mi (1%)      7m34s
  kube-system                 konnectivity-agent-748d7c6d7-wdjtd                          10m (1%)      0 (0%)      30Mi (1%)        125Mi (4%)     14d
  kube-system                 konnectivity-agent-autoscaler-7fd5dd4f5-czdgn               10m (1%)      0 (0%)      10M (0%)         0 (0%)         14d
  kube-system                 kube-dns-56494768b7-28ksr                                   260m (27%)    0 (0%)      110Mi (3%)       210Mi (7%)     14d
  kube-system                 kube-dns-autoscaler-f4d55555-t4lzn                          20m (2%)      0 (0%)      10Mi (0%)        0 (0%)         14d
  kube-system                 kube-proxy-gke-hello-cluster-web-node-pool-f13540b5-b426    100m (10%)    0 (0%)      0 (0%)           0 (0%)         7m35s
  kube-system                 l7-default-backend-69fb9fd9f9-ghjr8                         10m (1%)      0 (0%)      20Mi (0%)        0 (0%)         14d
  kube-system                 metrics-server-v0.4.5-bbb794dcc-wh4k9                       48m (5%)      143m (15%)  105Mi (3%)       355Mi (12%)    14d
  kube-system                 pdcsi-node-zr86d                                            10m (1%)      0 (0%)      20Mi (0%)        100Mi (3%)     7m32s
  web                         octopusproject-core-sample-5cfcb747db-b5p9b                 0 (0%)        0 (0%)      0 (0%)           0 (0%)         14d
Allocated resources:
  (Total limits may be over 100 percent, i.e., overcommitted.)
  Resource                   Requests         Limits
  --------                   --------         ------
  cpu                        571m (60%)       143m (15%)
  memory                     581473920 (19%)  1340Mi (47%)
  ephemeral-storage          0 (0%)           0 (0%)
  hugepages-1Gi              0 (0%)           0 (0%)
  hugepages-2Mi              0 (0%)           0 (0%)
  attachable-volumes-gce-pd  0                0
...略過...
調整 Deployment 設定 Resource
調整 章魚專案 的 Deployment
Pod requests: memory = 100Mi, cpu = 100m, ephemeralStorage = 1Gi
Pod limits: memory = 200Mi, cpu = 200m, ephemeralStorage = 2Gi
requests 是每個 Pod 初始建立時,會跟 Node 先請求的資源
limits 是每個 Pod 的資源極限值
# This YAML exposes the fields defined in the UI. It can be edited directly or have new YAML pasted in.
# Not all available Kubernetes properties are recognized by the form exposed in the UI, and unrecognized properties are ignored during import.
# If the required properties are not supported by this step, the 'Deploy raw Kubernetes YAML' step can be used to deploy YAML directly to Kubernetes, and supports all properties.
apiVersion: apps/v1
kind: Deployment
metadata:
  name: '#{K8s.Web.ProjectSimpleName}'
  labels:
    app: '#{K8s.Web.ProjectSimpleName}'
  namespace: '#{K8s.Web.Namespace}'
spec:
  selector:
    matchLabels:
      octopusexport: OctopusExport
  replicas: 1
  strategy:
    type: RollingUpdate
    rollingUpdate:
      maxUnavailable: 1
      maxSurge: 1
  template:
    metadata:
      labels:
        app: '#{K8s.Web.ProjectSimpleName}'
        octopusexport: OctopusExport
    spec:
      containers:
        - name: web-container
          image: '#{K8s.Web.ImageRegistry}'
          ports:
            - name: http
              containerPort: '#{K8s.Web.WebPort}'
              protocol: TCP
          env:
            - name: ASPNETCORE_ENVIRONMENT
              value: '#{Octopus.Environment.Name}'
          resources:
            requests:
              memory: 100Mi
              cpu: 100m
              ephemeralStorage: 1Gi
            limits:
              memory: 200Mi
              cpu: 200m
              ephemeralStorage: 2Gi
          livenessProbe:
            httpGet:
              host: ''
              path: '#{K8s.Web.Core.HealthCheckPath}'
              port: '#{K8s.Web.WebPort}'
              scheme: HTTP
          readinessProbe:
            periodSeconds: 15
            httpGet:
              host: ''
              path: '#{K8s.Web.Core.HealthCheckPath}'
              port: '#{K8s.Web.WebPort}'
              scheme: HTTP
      affinity:
        nodeAffinity:
          requiredDuringSchedulingIgnoredDuringExecution:
            nodeSelectorTerms:
              - matchExpressions:
                  - key: cloud.google.com/gke-nodepool
                    operator: In
                    values:
                      - web-node-pool
新增 HorizontalPodAutoscaler
新增 Step
選擇 DEPLOY RAW KUBERNETES YAML
apiVersion: autoscaling/v2beta2
kind: HorizontalPodAutoscaler
metadata:
  name: '#{K8s.Web.ProjectSimpleName}-hpa'
  namespace: '#{K8s.Web.Namespace}'
spec:
  scaleTargetRef:
    apiVersion: apps/v1
    kind: Deployment
    name: '#{K8s.Web.ProjectSimpleName}'
  minReplicas: 1
  maxReplicas: 4
  metrics:
  - type: Resource
    resource:
      name: cpu
      target:
        type: AverageValue
        averageValue: 75m
  - type: Resource
    resource:
      name: memory
      target:
        type: AverageValue
        averageValue: 150Mi
部屬後再查看一下資源
kubectl get hpa -n web

# 輸出
NAME                             REFERENCE                               TARGETS                   MINPODS   MAXPODS   REPLICAS   AGE
octopusproject-core-sample-hpa   Deployment/octopusproject-core-sample   1m/75m, 29675520/150Mi   1         4         1          86s

kubectl top pod -n web

# 輸出
NAME                                          CPU(cores)   MEMORY(bytes)
octopusproject-core-sample-64c6899cc5-7r4bc   1m           28Mi
測試 Pod Autoscaling
curl https://octopuscoresampleqc.leozheng0512.com/Home/GetEnv

# 輸出
"qc"
透過壓測工具呼叫該 API 讓 Pod 的 Memory、CPU 增長,藉此觀察是否會 Autoscaling
若要使用 JMeter 可參考此篇文章 w4560000 - JMeter壓力測試 範例
kubectl get hpa -n web

# 輸出
NAME                             REFERENCE                               TARGETS                        MINPODS   MAXPODS   REPLICAS   AGE
octopusproject-core-sample-hpa   Deployment/octopusproject-core-sample   126m/75m, 67816106666m/150Mi   1         4         4          6h5m

kubectl top pod -n web

# 輸出
NAME                                          CPU(cores)   MEMORY(bytes)
octopusproject-core-sample-84c96c84fd-58ptz   123m         74Mi
octopusproject-core-sample-84c96c84fd-f6w75   127m         57Mi
octopusproject-core-sample-84c96c84fd-sdpmq   129m         67Mi


kubectl get pod -n web

# 輸出
NAME                                          READY   STATUS    RESTARTS   AGE
octopusproject-core-sample-84c96c84fd-58ptz   1/1     Running   0          6m25s
octopusproject-core-sample-84c96c84fd-f57jl   0/1     Pending   0          4m43s
octopusproject-core-sample-84c96c84fd-f6w75   1/1     Running   0          4m43s
octopusproject-core-sample-84c96c84fd-sdpmq   1/1     Running   0          4m43s
此時可發現 hpa 已經觸發到生成第四個 pod , 但其中一個 Pod 卻是 Pending 狀態
再進一步查看 Pod 狀況
kubectl describe pod octopusproject-core-sample-84c96c84fd-f57jl -n web

# 輸出
Name:           octopusproject-core-sample-84c96c84fd-f57jl
...略過...
Events:
  Type     Reason                   Age                     From                     Message
  ----     ------                   ----                    ----                     -------
  Normal   LoadBalancerNegNotReady  8m23s                   neg-readiness-reflector  Waiting for pod to become healthy in at least one of the NEG(s): [k8s1-be718682-web-octopusproject-core-sample-80-4f762aac]
  Normal   NotTriggerScaleUp        3m20s (x31 over 8m21s)  cluster-autoscaler       pod didn't trigger scale-up:
  Warning  FailedScheduling         45s (x9 over 8m23s)     default-scheduler        0/1 nodes are available: 1 Insufficient cpu.
可以發現是因 CPU 不足,造成 Pod 無法順利運行
此時往前看,在還沒部署時,CPU request 是 571m,可分配是 940m
也就是 940m - 571m = 369m,在該 Node 上,我們只剩下 369m 可使用
每一個 CPU Request 為 100m,以至於前三個 Pod 都順利建立,而第四個 Pod 才建立失敗
此時可手動調節 Node 資源,或是設定 ClusterAutoscaler 自動調節 Node 資源
GKE 的 ClusterAutoscaler 可參考 GCP 官方文件 - Cluster autoscaler
查看 hpa auto scaling 紀錄
可發現當 CPU or Memory 低於水位時,hpa 會每五分鐘檢查,並自動縮減 Pod 數量
kubectl describe hpa octopusproject-core-sample-hpa -n web

# 輸出
Name:                       octopusproject-core-sample-hpa
...略過...
Events:
  Type     Reason                   Age                  From                       Message
  ----     ------                   ----                 ----                       -------
  Normal   SuccessfulRescale        35m                  horizontal-pod-autoscaler  New size: 2; reason: cpu resource above target
  Normal   SuccessfulRescale        31m                  horizontal-pod-autoscaler  New size: 3; reason: cpu resource above target
  Warning  FailedGetResourceMetric  23m (x6 over 6h25m)  horizontal-pod-autoscaler  did not receive metrics for any ready pods
  Normal   SuccessfulRescale        23m (x2 over 28m)    horizontal-pod-autoscaler  New size: 4; reason: cpu resource above target
  Normal   SuccessfulRescale        7m15s                horizontal-pod-autoscaler  New size: 2; reason: memory resource below target
  Normal   SuccessfulRescale        2m14s                horizontal-pod-autoscaler  New size: 1; reason: cpu resource below target
結論
Pod 能自動 auto scaling 也是 K8S 強大的功能之一,能夠自動化的調節服務資源,也節省了維運單位的人力成本
只是在使用前,Node 資源 與 Pod 所需資源需要預先計算好,以避免 Node 資源不夠的狀況發生
參考文章
zxcvbnius - [Day 25] 實現 Horizontal Pod Autoscaling - HPA
轉載請註明來源,若有任何錯誤或表達不清楚的地方,歡迎在下方評論區留言,也可以來信至 leozheng0621@gmail.com
如果文章對您有幫助,歡迎斗內(donate),請我喝杯咖啡

