開發環境
- Windows 10 (pro 22H2)
本文範例流程
- 透過 OpenSSL 工具依序建立 跟憑證、中繼憑證、終端憑證
- 將憑證轉為 .pfx檔、匯入Windows中,於 IIS 測試使用
- docker compose 建立範例 Nginx ,使用自建憑證測試使用
自建憑證
跟憑證建立
- 建立跟憑證設定檔 root-ssl.conf
[req]
prompt = no
default_md = sha256
default_bits = 2048
distinguished_name = dn
x509_extensions = v3_ca


[dn]
C = TW
ST = Taiwan
L = Taichung
O = LeoTest Inc.
OU = Web
CN = rootleotest.com

[v3_ca]
nsCertType = server
subjectKeyIdentifier=hash
authorityKeyIdentifier=keyid:always,issuer:always
basicConstraints = critical, CA:true
- OpenSSL 建立跟憑證
# 建立 ROOT 私鑰
openssl genrsa -aes256 -out root.key 4096

# 建立 ROOT 公鑰
openssl req -new -x509 -key root.key -days 3650 -sha256 -config ./root-ssl.conf -out root.pem

# 檢查憑證
openssl x509 -noout -text -in root.pem
中繼憑證建立
- 建立中繼憑證設定檔 ca-ssl.conf
[req]
prompt = no
default_md = sha256
default_bits = 2048
distinguished_name = dn
x509_extensions = v3_req

[dn]
C = TW
ST = Taiwan
L = Taichung
O = LeoTest Inc.
OU = Web
CN = caleotest.com
ca.ext
subjectKeyIdentifier = hash
authorityKeyIdentifier = keyid:always,issuer
basicConstraints = critical, CA:true, pathlen:0
keyUsage = critical, digitalSignature, cRLSign, keyCertSign
subjectAltName = @alt_names

[alt_names]
DNS.1 = *.leotest.com
- OpenSSL 建立中繼憑證
# 建立中繼 CA 私鑰
openssl genrsa -aes256 -out ca.key 4096

# 建立中繼 CA CSR
openssl req -sha256 -new -key ca.key -config ./ca-ssl.conf -out ca.csr

# 簽發中繼 CA
openssl x509 -req -in ca.csr -CA root.pem -CAkey root.key -CAserial ca.serial -CAcreateserial -days 3650 -extfile ca.ext -out ca.pem

# 檢查憑證
openssl x509 -noout -text -in ca.pem

# 驗證
openssl verify -CAfile root.pem ca.pem
建立終端憑證
- 建立終端憑證設定檔 cert.conf
[req]
prompt = no
default_md = sha256
default_bits = 2048
distinguished_name = dn
x509_extensions = v3_req

[dn]
C = TW
ST = Taiwan
L = Taichung
O = LeoTest Inc.
OU = Web
CN = 0724.leotest.com

[v3_req]
subjectAltName = @alt_names

[alt_names]
DNS.1 = 0724.leotest.com
建立 leotest_com.ext
authorityKeyIdentifier=keyid,issuer
basicConstraints=CA:FALSE
keyUsage = digitalSignature, nonRepudiation, keyEncipherment, dataEncipherment
subjectAltName = @alt_names

[alt_names]
DNS.1 = *.leotest.com
- OpenSSL 建立終端憑證
# 建立終端憑證 私鑰
openssl genrsa -aes256 -out leotest_com.key 4096

# 建立終端憑證 CSR
openssl req -sha256 -new -key leotest_com.key -config ./cert.conf -out leotest_com.csr

# 簽發終端憑證
openssl x509 -req -in leotest_com.csr -CA ca.pem -CAkey ca.key -CAserial ca.serial -CAcreateserial -days 3650  -extfile leotest_com.ext -out leotest_com.pem

# 檢查
openssl x509 -noout -text -in leotest_com.pem
- 驗證終端憑證
# 組合根憑證、中繼憑證
type ca.pem root.pem > ca-bundle.crt

# 驗證
openssl verify -CAfile ca-bundle.pem leotest_com.pem
建立 PFX 憑證 並匯入IIS做測試
創建 .pfx 憑證
openssl pkcs12 -export -out "leotest_com.pfx" -inkey "leotest_com.key" -in "leotest_com.pem" -name "leotest_com"跟憑證、中繼憑證匯入自本機電腦憑證清單中
# 匯入 Windows 受信任的根憑證授權單位
certutil -addstore -f "ROOT" root.pem

# 匯入 Winddows 中繼憑證授權單位
certutil -addstore -f "CA" ca.pem
- 終端憑證匯入自IIS中
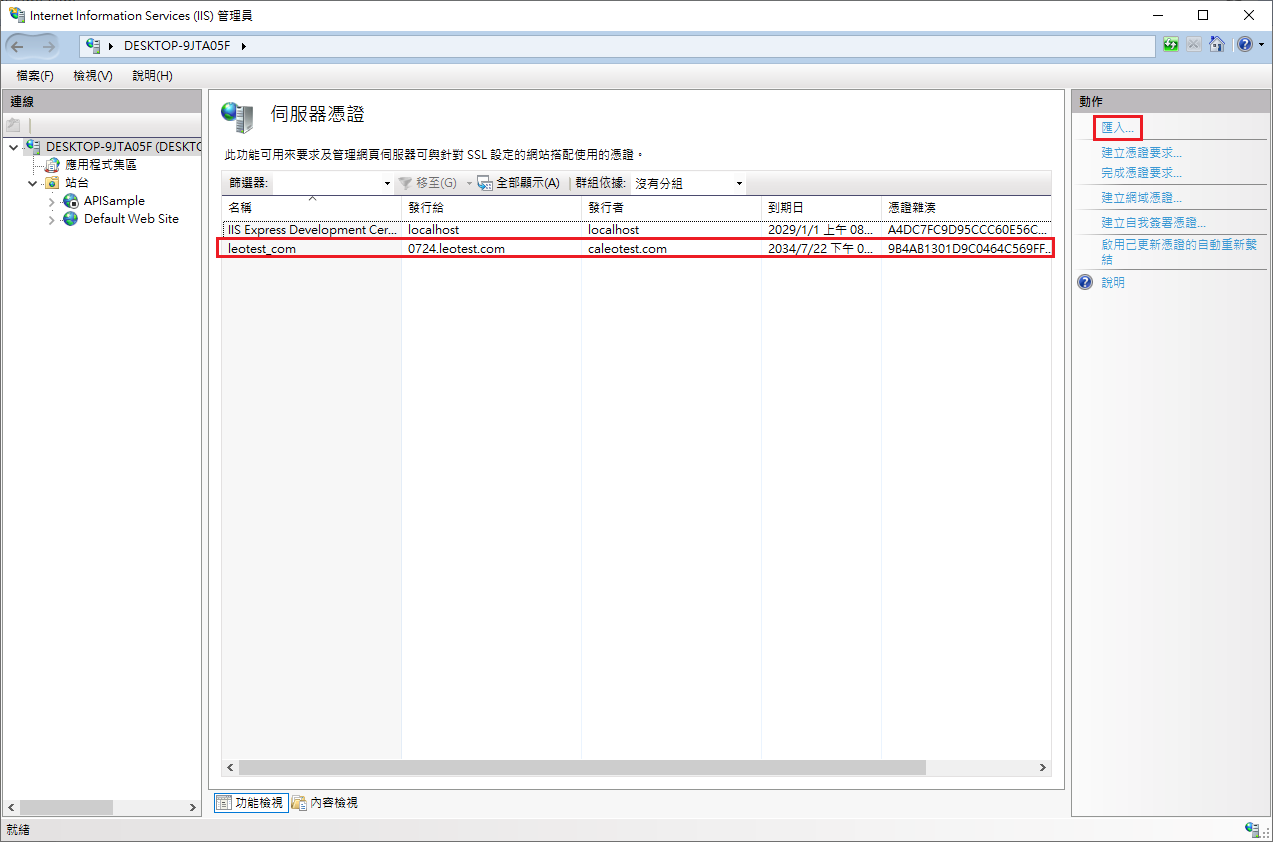
憑證綁定站台
確認功能正常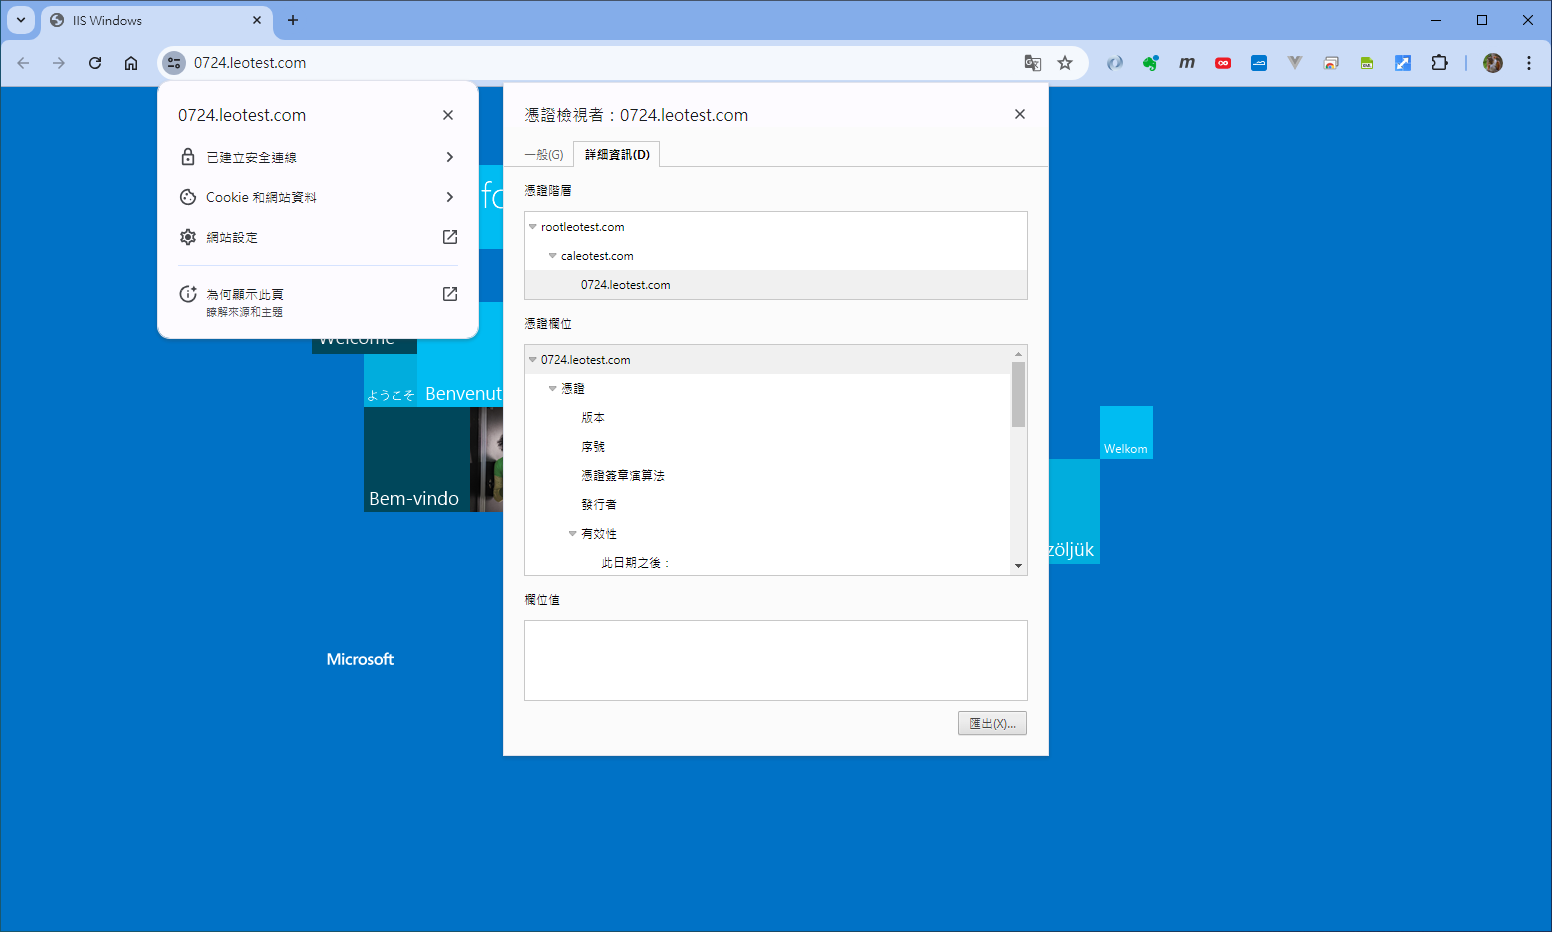
docker compose 建立範例 Nginx ,匯入憑證做測試
建立 fullchain.crt
type leotest_com.pem ca-bundle.crt > fullchain.crt建立設定檔 nginx.conf
server {
    listen 80;
    listen [::]:80;
    listen 443 ssl;
    server_name SERVER_IP;

    location / {
        root   /usr/share/nginx/html;
        index  index.html index.htm;
    }

    ssl_password_file /etc/nginx/ssl/leotest_com.pw;
    ssl_certificate /etc/nginx/ssl/fullchain.crt;
    ssl_certificate_key /etc/nginx/ssl/leotest_com.key;

    proxy_set_header Host $http_host;
    proxy_set_header X-Real-IP $remote_addr;
    proxy_set_header X-Forwarded-For $proxy_add_x_forwarded_for;
}
- 建立 leotest_com.pw
憑證的密碼
1234
- 建立 docker-compose.yml
version: '3'

services:
  webserver:
    image: nginx:latest
    ports:
      - 80:80
      - 443:443
    restart: always
    volumes:
      - ./nginx.conf:/etc/nginx/conf.d/nginx.conf
      - ./fullchain.crt:/etc/nginx/ssl/fullchain.crt
      - ./leotest_com.key:/etc/nginx/ssl/leotest_com.key
      - ./leotest_com.pw:/etc/nginx/ssl/leotest_com.pw
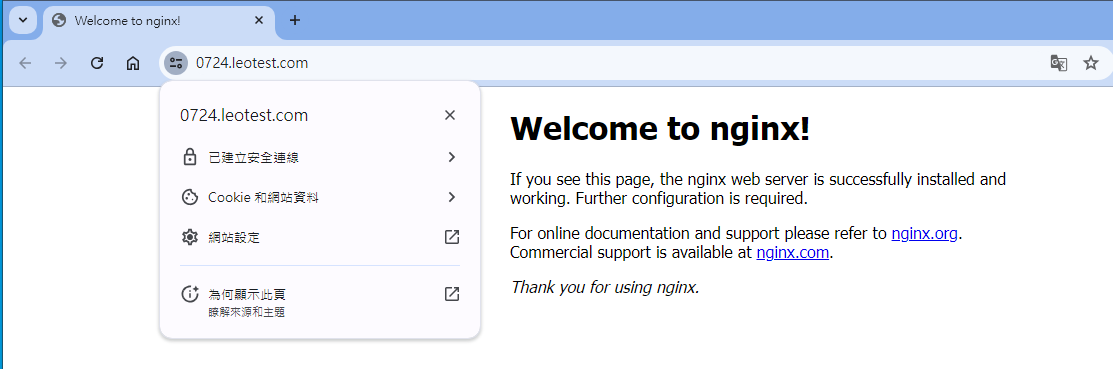
- 啟動確認
docker-compose up -d
參考文件
The Will Will Web - 如何使用 OpenSSL 建立開發測試用途的自簽憑證 (Self-Signed Certificate)
馬特的心靈雞湯 - 使用OpenSSL建立自簽SSL憑證
yzai - openSSL 自發憑證
轉載請註明來源,若有任何錯誤或表達不清楚的地方,歡迎在下方評論區留言,也可以來信至 leozheng0621@gmail.com
如果文章對您有幫助,歡迎斗內(donate),請我喝杯咖啡

